All posts by 3DM

Alaska Airlines flight in 3D

Horizon Air flies Bombardier’sde Havilland Dash 8 Series Q400 70 passenger turbo props for Alaska’s shorter routes. This photo was taken at the Oregon International Air Show in the summer of 2013, as a conventional 2D photograph. I converted it to 3D by creating a depth map using StPaint Plus.

Click either image to see the full size version on Flickr. Be sure to subscribe to my Flickr photostream as I am now adding photos every week.

Alaska Air, in 3D, red/cyan anaglyp

Alasak Air, in 3D, in crosseyed format
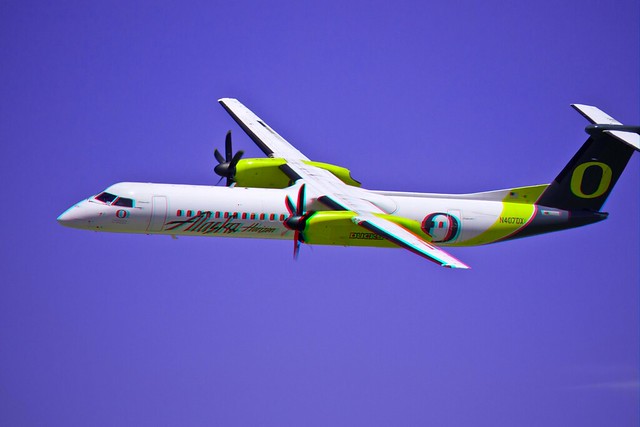
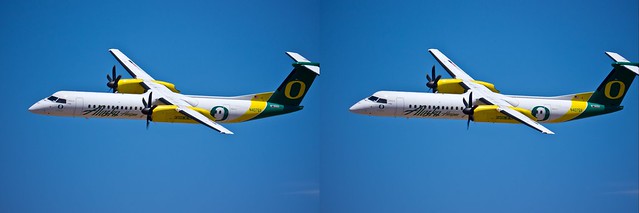
Alaska/Horizon have painted one aircraft with the logo and colors of each college/university for the towns they fly too. They fly to Eugene, OR, home of the University of Oregon – and this is the aircraft painted in the UofO scheme. They’ve done this for many college towns, including, for example, Washington State University in Pullman, WA.

This fly over at the Oregon International Airshow at the Hillsboro, OR airport, was extremely well received, to put it mildly. A very enthusiastic crowd response. The aircraft was piloted by a captain who lives in Hillsboro, OR and who did his first flight training at Hillsboro Airport.

How-to: Make a fake diopter adjustment for an LCD Viewfinder Hood

I have a couple of Nikon 1 J1 and J2 cameras that I bought used/refurbished for 3D shooting. I originally thought I would use these cameras for only 3D – but I find I really like these cameras for many reasons – 1″ sensor, very compact, excellent image quality, very sharp lenses, and very good low light capability. And with some close up filters, they’ve become one of my “go to” cameras for close up/macro photography.

But as you know, cameras with only an LCD viewfinder (no electronic eye viewfinder) can be tough to use in bright sun. They are a hassle for those of us that need to wear reading glasses (and only reading glasses) for close in viewing since we have to find and put on our reading glasses every time we take photos.

To solve this, I bought an LCD viewfinder hood. Unfortunately, none of these have diopter adjustments to correct for eye variations among users. Dumb omission! Without a diopter adjustment, I cannot get a clean focus.

OLYMPUS DIGITAL CAMERAI solved this by busting a lens out of a retail store cheap reading glasses set and just taping it in front of the existing lens. Crude – but it actually works! Now  I can see the LCD panel in focus without my reading glasses – even in bright light 🙂

I used gaffer’s tape to mount the lens as nothing else would stick to the rubber eyepiece. I thought this idea might be helpful to others.

OLYMPUS DIGITAL CAMERA


Panasonic Lumix FZ1000 with 4k video just announced

This is really quite an amazing new camera: Panasonic just introduced the Panasonic Lumix DMC-FZ1000 or as it will probably be known, the Lumix FZ1000. A “bridge” type camera with long lens and manual override features and some amazing specifications:

  • 4k 30p video – yes, for real, at 100 Mbps! Plus 1080/60p, 30p and 24p too.
  • 20.1 megapixel 1″ sensor
  • f/2.8 to f/4.0 25-400 full frame equivalent zoom lens
  • Wi-Fi remote capability (use smartphone or tablet as the remote controller), NFC or QR code easy connections between camera and phone/tablet
  • Articulating LCD screen plus 2.35 MP electronic viewfinder
  • Highspeed auto focus
  • 12 fps continuous shooting
  • 8 megapixel image resolution from capturing still images from 4k video
  • Uses the same Venus IV processor as the Lumix GH-4


With a list price under $900. Shipping July 27th but taking pre-orders now. I suspect there will be high demand for this. Panasonic has posted a demo 4k to 2K converted video on Youtube that looks stunning.

Competes very well with the Sony RX10 but makes the Nikon 1 V3 look overpriced (and no 4k video there either). All of these cameras use a 1″ sensor.

The Sony and Panasonic cameras look, at this point, to take a dominant role in the “bridge” camera segment. Panasonic is also rumored to be introducing an LX8 this summer. The LX8 will replace the LX7 by adding 4k video and an articulating LCD screen, say the rumors.

Seems likely that the era of the 1/2.33″ sensors is over with. Why take crap photos with a small sensor when you can do that with your smart phone? The Canon s100/s110/s120, the LX7 and the Olympus XZ-1/XZ-2 all use 1/1.7″ sensors. Seems that the desire for higher image quality and better low light performance – and better than a smart phone camera – may move the camera market to these larger sensors fairly rapidly.

How-To: Learning to fly a quad copter

Thinking of flying a quad copter but you have no experience? And you need to teach yourself?

My recommendation, and that of others, is to start with an inexpensive radio controlled toy. You will crash. You will break stuff. And fixing an inexpensive RC toy costs a lot less than a $1,000 or $4,000 multi-copter.

I have the Hubsan X4 with its integrated 720p video camera. They are available at Amazon:


The camera is okay but its not anything fantastic. It’s a fun to have feature but if your goal is learning to fly, you can get a version without the camera for about half the price:

I also recommend a “crash pack” or at least an additional set of blades, plus spare batteries:

I have this set of 5 extra batteries and they work just fine. Keep in mind that on a small quad copter like this, your battery life may be only 5-8 minutes, depending on whether the camera is turned on, the LED lights are turned on, or if you have the rotor protection ring installed (adds weight). You will be changing batteries frequently.
<
In spite of your best intentions, you will hit stuff and a blade or two will go flying and may become very hard to find.  I once hit the ground hard out in front the house and one of the blades hit a brick and just vanished. I had the video camera going at the time and watched that frame by frame in hopes I’d spot the blade, but didn’t. Not until a week later did I find it about 25 feet away.  Order a set of extra blades.

I need to put together a tutorial on setting up and configuring the Hubsan as the instruction booklet was not very clear to me – and I even have a pilot’s license:)

The key is that you need to calibrate the control system so that everything is balanced. This basically means setting the “trim” tabs for roll, pitch and yaw. And you do that by briefly powering up on grass or indoor carpet (if indoors USE THE BLADE PROTECTOR that is hidden underneath the plastic packaging in the box).

If the quadcopter drifts sideways or forwards or back, you’ll need to adjust the trim tabs on the flight controller. There is no easy way to describe this in words – I really need to make a tutorial video.  Once you figure out how to do this, the process is simple. And the goal is that the quadcopter will roughly hover and drift very slowly once it is trimmed up properly.

After that, start practicing. It took me many flights to reach a point where I could stationary hover and maintain altitude. And then more practice flights to learn to maneuver. And that was all done in the living room. Then more practice outdoors in the yard.

ALWAYs move the controls slowly. Don’t let the aircraft get away from you. If you feel you are about to crash and perhaps fly off, reduce the throttle and land. Get yourself re-oriented and start over.

I really need to make a tutorial video to explain this!